What is a Wicking Bed and Build your Own
Since I have been doing the whole wicking bed cultivation for some time now, I have seen various of garden products and designs come and go. Eventually, I came across the innovation of wicking beds, this excites me every time I speak of it.
You may find yourself asking why do I need a wicking bed and why would I want one?
A wicking bed is simply just a large watering pot with the form of a garden bed. Well, it is a bit more complex than that. The main idea of it is like a large garden bed that is constructed to bring water from the reservoir below. This system was designed by an Australian engineer by the name of Colin Austin. Wicking beds and wicking worm beds are greatly gaining approvals as the brilliant water intelligent garden bed substitute.
Drawing up water from the reservoir underneath, the wicking beds will function on the idea of vessel action, the soil and plants will draw the water upwards as necessary. Essentially, if constructed and maintained properly, the wicking bed will have moist soil a good amount of time, the plant roots will access the water when needed.
Wicking beds have a variety of benefits like cultivation and environmental benefits. Firstly, it is great for a thirsty garden in certain areas that have little rainfall. Wicking beds deliver water where it is essential. This minimizes wastewater and the issue of fungal foliage problems. It is said that wicking beds are even more effective at confiscating atmospheric carbon than any of the other old-fashioned garden beds. This means we and the planet are winning.
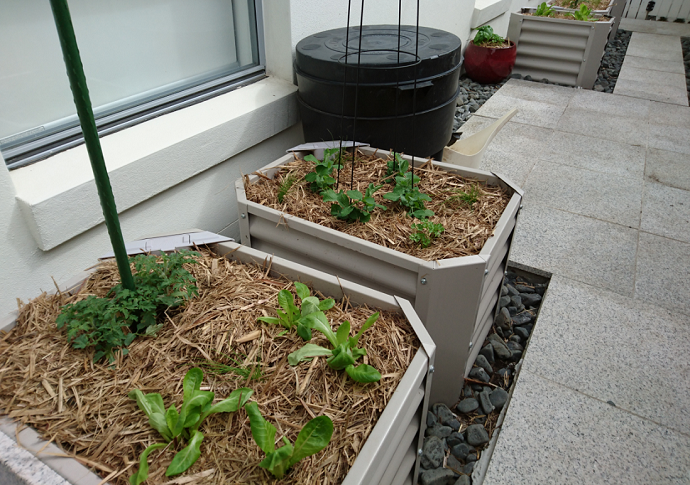
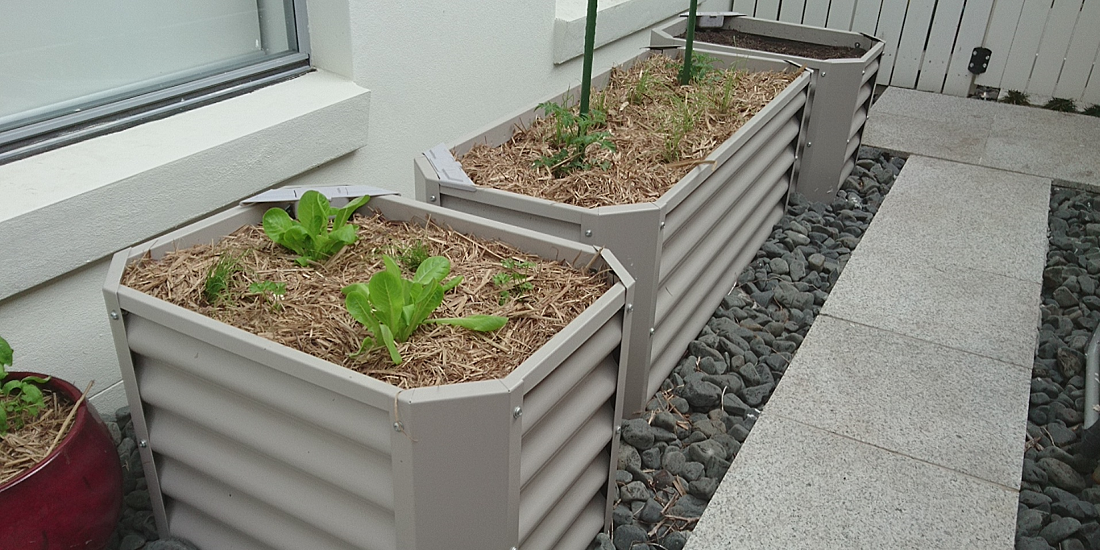
Wicking Beds are a very good start to making a low maintenance garden and finances should not hold you back. You can buy them preassembled or a kit from a local hardware store, but below is a good guide to making your own.
How to Construct a Wicking Bed.
Explaining to anyone on how to build a wicking bed, can be very difficult so, for now, let’s look at the smaller parts of building a wicking bed. Mainly, it is about having the correct depth, the proper medium, for both drainage and growing the plants. Now it does take some time to properly construct the wicking bed. Yes, I know that sounds a bit dreary, but I guarantee you, you will be thanking me soon. Well, I know you all just cannot wait to get this started so here we go.
1. You will need to pick a suitable site for the patch. This will ensure that is level, wicking beds are at their best when they are leveled, this ensures that water distribution down the track is even.
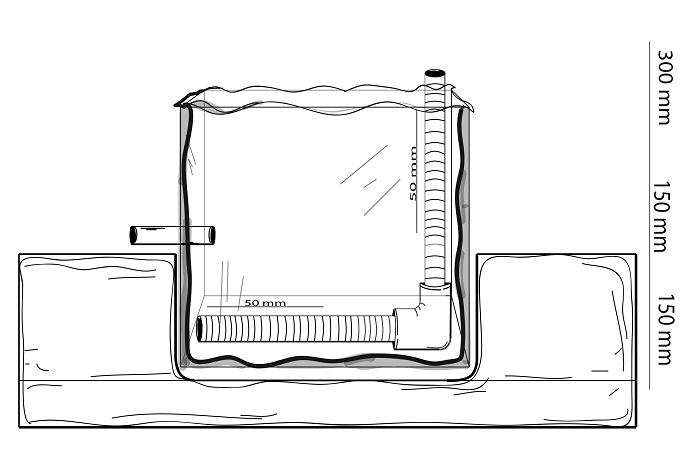
2. The depth of your patch varies depending on what you want to plant. On average the wicking bed for vegetables is 600mm. This connects to the 300mm for the reservoir saturation zone and then 300mm for the root zone. Please note that all the wicking bed wizards agree that water cannot and will not be wicked further than 300mm. Please keep this in mind when you are looking to construct your patch.
3. Half of the 300mm reservoir area must contain gravel and the water pipe. The other 150mm contains the soil blend. You should prepare this first.
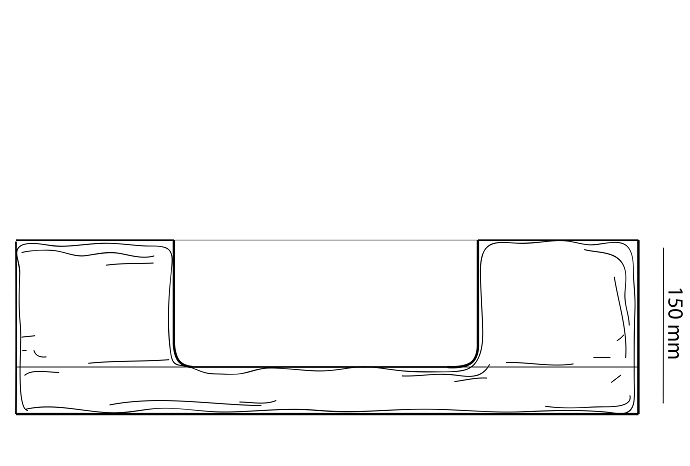
4. If you plan on gardening on soil, to ensure that it is leveled you need to dig a hole to a depth of 150mm, this will also help form the reservoir. If you are putting your garden on a hard surface, make sure it is level then move on to the next step.
5. Including the hole that you have just dug, the bed should have a total depth of 600mm. Line the whole bed with a good quality builder plastic. Make sure there are no holes or tears. You might want to add a thin bed of sand to the bottom of the reservoir hole, this will help prevent tears in the plastic.
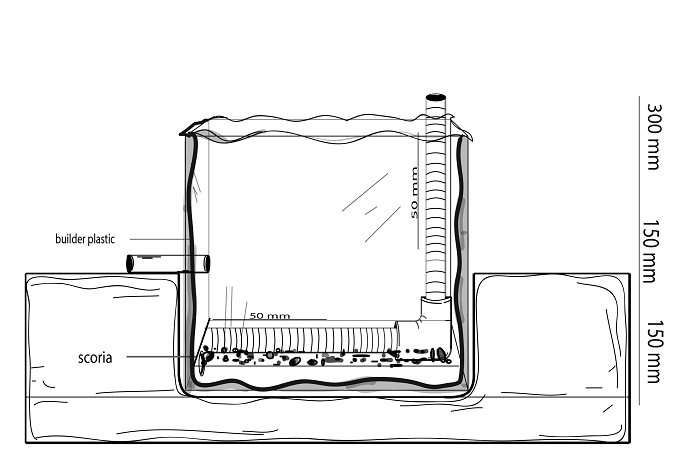
6. Now it is time for the water distribution system. You will need to whack an inch of scoria into the bed for the pipe to sit on. This acts to improve the drainage. Next, you will need to install a 50mm PVC pipe vertically, attached to the PVC 90-degree elbow that will sit next to the base of the bed on top of the scoria that you have just placed. You will need to attach the length of 50mm slotted agi pipe to the elbow. This runs the length of the bed along the center. Then simply place a cap on the end of the agi pipe.
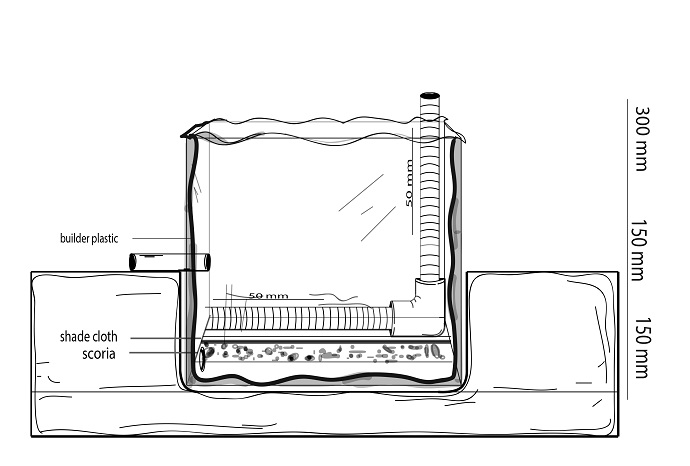
7. Cover the pipe and bed of the scoria with a depth of 150mm. You need to cover the scoria with a shade cloth. This will prevent soil pieces from moving into the reservoir and block the pore spaces.
8. Fill up the next 150mm in the wicking bed with top quality water retentive soil. This will help form the “saturation layer”. This will not be where the vegetables will be planted.
9. The top of the soil level (300mm) you must install an overflow. This allows the additional water to leave the bed after substantial periods of rain. By using a water tank outlet and drilling the appropriate sized hole through the end of the bed opposite of the water inlet is the probably the best way to do this. This will help the soil in the root area that may become useless.
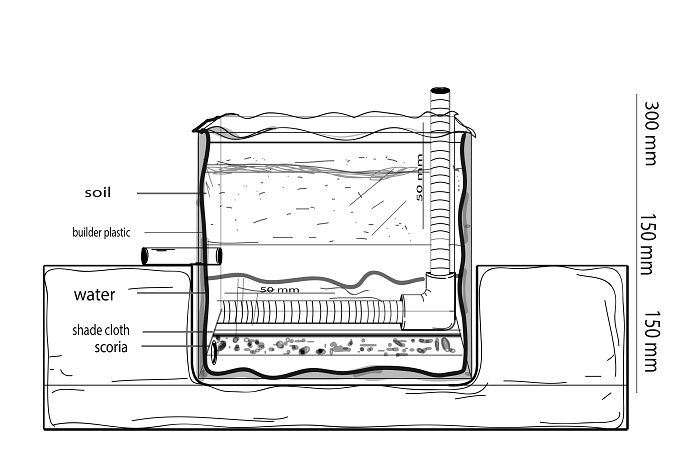
10. With a top quality soil/compost blend fill the remaining 300mm or so of the bed. I would recommend ½ mushroom compost, ½ organic soil mix. Research and overall experience show that wicking beds will work better with a higher that average compost quota. You should never use the soil that surrounds garden especially if it is high in clay content. You need to mulch with straw base mulch just make sure you do not cover the PVC pipe opening.
11. By using a hose, while following local water restrictions, make sure to fill the wicking bed reservoir with the PVC pipe opening. You might want to a tomato stake like a “dipstick” to see the depth of the water. The reservoir needs to be about 200mm full.
12. When the soil is damp, you can plant out the wicking bed with your favorite incredible provisions.
13. Lastly, just sit back and enjoy your wicking bed!
Keeping Your Wicking Beds Alive
If your wicking bed is left untended for a long time it can easily become a sludgy, salty and smelly unproductive mess. It definitely is not a no maintenance set-up. Something I would like for you to be aware of and look in your wicking bed over time is:
• Make sure that the overflow hole does not become blocked. Every few months you will need to give this a good clean out.
• Please understand that as a closed system what is put in stays in. Overuse of the fertilizers may sour soil fairly fast this will lead to amplified saltiness. This is definitely not ideal for many of your productive vegetables and herbs.
• Water from the bathroom or laundry must not be used at any time in the wicking bed.
• Soil mixture and compost must be topped seasonally. An excellent idea may be to turn the top 300mm of growing area with a fork to aerate the soil that will help freshen it up.
• To prevent mosquito larvae for hanging around the tube or garden reservoir, you should cover the open end of the PVC up with a brick or something similar.
Now that is the “wash” on wicking beds. With is a new method; we do know that there will be a trailblazer of gardeners out there that already have success stories to share. If you have information on wicking bed and would like to let me know about you attempts. Put in a comment the end of this article. I enjoy hearing what is going on in the wonderful world of wicking beds.
Illustrations by, Dragan Gunjov